What: test
When: January 14, 2017 at 09:49AM
Extra Data: , , ,
Saturday, 14 January 2017

This is a "test" of my 6LoWPAN connected device
What: test
When: January 14, 2017 at 09:46AM
Extra Data: , , ,
When: January 14, 2017 at 09:46AM
Extra Data: , , ,
This is a "test" of my 6LoWPAN connected device
What: test
When: January 14, 2017 at 09:30AM
Extra Data: , , ,
When: January 14, 2017 at 09:30AM
Extra Data: , , ,
Friday, 13 January 2017
This is a "test" of my 6LoWPAN connected device
What: test
When: January 13, 2017 at 06:54PM
Extra Data: , , ,
When: January 13, 2017 at 06:54PM
Extra Data: , , ,
Monday, 9 January 2017
This is a "test" of my 6LoWPAN connected device
What: test
When: January 9, 2017 at 07:49PM
Extra Data: , , ,
When: January 9, 2017 at 07:49PM
Extra Data: , , ,
Friday, 16 December 2016
This is a "test" of my 6LoWPAN connected device
What: test
When: December 17, 2016 at 08:10AM
Extra Data: , , ,
When: December 17, 2016 at 08:10AM
Extra Data: , , ,
This is a "test" of my 6LoWPAN connected device
What: test
When: December 16, 2016 at 10:02AM
Extra Data: , , ,
When: December 16, 2016 at 10:02AM
Extra Data: , , ,
Tuesday, 13 December 2016
This is a "test" of my 6LoWPAN connected device
What: test
When: December 13, 2016 at 06:21PM
Extra Data: 256, 25091, 3240,
When: December 13, 2016 at 06:21PM
Extra Data: 256, 25091, 3240,
This is a "test" of my 6LoWPAN connected device
What: test
When: December 13, 2016 at 06:21PM
Extra Data: 0, -31582, 3244,
When: December 13, 2016 at 06:21PM
Extra Data: 0, -31582, 3244,
This is a "test" of my 6LoWPAN connected device
What: test
When: December 13, 2016 at 06:21PM
Extra Data: 256, 24834, 3240,
When: December 13, 2016 at 06:21PM
Extra Data: 256, 24834, 3240,
Sunday, 18 October 2015
A simple WiFi power cord switch with the OLIMEX ESP8266 evaluation board
 |
| Image taken from OLIMEX website |
After some months of having a couple of OLIMEX ESP8266 evaluation boards lying around in my office desk, I decided to jump in the ESP8266 hype train and see by myself how this US$5 WiFi module changed the maker landscape.
I was not dissapointed.
The ESP2866
The ESP8266 is a highly integrated SoC (System on Chip) which includes Xtensa LX106 core processor, RAM, a RF front end and allow WiFi TCP/IP stack to be implemented on board. The ESP8266 is capable of either hosting an application or offloading all WiFi networking functions from another application processor.
I wasn't interested in driving the ESP8266 with another controller, but to flash an application and use it as a stand-alone module, mostly to keep any future BOM as low as possible. After taking a look at the ESP8266 features it seemed possible to run most applications from within the device:
- It has GPIO, I2C, ADC, SPI, PWM.
- A 80 MHz operation frequency
- 64 Kb of instruction RAM
- 96 Kb of data RAM
- 64 Kb boot ROM
- Winbond W25Q40BVNIG SPI flash
- RISC architecture
- The core is a 106micro Diamond Standard core (LX3) made by Tensilica.
As we need to consider also the available resources left for the application taking into the account the stack itself, from this page the actual RAM/ROM are about 40 Kb and 64 Kb.
The ESP8266 evaluation board by OLIMEX features a 220VAC/10A relay module and conveniently exposes most pins in a standard 2.54 mm header, which is great to have available when developing. It also features an user button which can also be used to put the ESP2866 in bootloader mode, to allow flashing over UART.
Installing the toolchain
sudo add-apt-repository ppa:dns/gnu -y

sudo apt-get update -q

sudo apt-get install --only-upgrade autoconf
As a general recommendation install the ESP8266 toolchain as suggested in the /opt/Espressif, as many applications (like the OLIMEX examples and resources) are heavily hard-coded to use this path.
I also recommend to use the suggested Espressif SDK v0.9.3 instead of the newer v.1.2.0, as I (painfully) found that many applications and examples were written for the earlier version, and porting for the new SDK version required more time than I had available for a simple test run.
Flashing the ESP2866
The ESP2866-EVB comes with factory-enabled flash mode, which allows to program the device over UART. I used a cheap USB to serial converter, wired as shown below.

 |
| Image taken from Instructables site |
- GND (blue wire to pin 2)
- USB to Serial UART RX pin to ESP2866 UART TX (green wire to pin 3)
- USB to Serial UART TX pin to ESP2866 UART RX (red wire to pin 4)
The ESP8266-EVB datasheet has more information.
To put the device in bootloader mode just make sure the board is powered off, press and hold the user button (the big white one), and while pressing the button power the board (connect to 5VDC).
Making a WiFi enabled power cord switch
I wanted to see how fast would it be to make a connected application. In nearly 10 minutes I had a WiFi enabled power cord switch. The motivation was simple: power on and off anything in my house running at 220V/10A from anywhere in the world (as in my bed), without having to cut or adapt any home appliance for this purpose, a non-intrusive approach to keep my wife happy and myself out of the couch.

The specification was simple enough: power the ESP8266 directly from mains and use the relay with the normally open (NO) mode as devices would normally have to be off. As time was my premise, I

I kept the USB charger casing to isolate the electronics and avoid someone touching mains by accident.
Now for the firmware I used the stock IoT Firmware image from OLIMEX resources, this handy application allows any web developer to easily control most of the ESP8266 evaluation board features, like managing the wireless network, create and poll events and status related to the user button and relay, manage I2C devices, update the Firmware image remotely, amongst others.
 |
| OLIMEX IoT Firmware and sample application |
And that's it! a simple WiFi-enabled power cord in 10 minutes.
I tested with a desk lamp and other appliances (under 10A), as it only requires to plug into the female connector of the power cord is easy to use anywhere.
A future enhancement would be to add sensors like an ambient light or temperature sensor, to provide more information about the current location, maybe a presence sensor to allow an event-based operation. Of course making a proper PCB with a 220VAC/5VDC transformer would be mandatory.
Now to further play with the ESP8266 and dig into the source code.
Thursday, 4 December 2014
Wireless Garden sensing Prototype A and B (Intel Galileo, Spark Core and Grove)
We have a small garden at home and adding sensors to it was merely a matter of time, specially now that winter is coming, and it is time to plant our pepper and tomatoes plants. Below are the two iterations made to my wireless gardening sensor (still in beta stage).
For the first prototype I used the Intel Galileo Board I won at Senzations, the objective was to test the sensors, familiarize with the obtained values, and test publishing to Ubidots. For the test I used my wife's pepper plant.

Light, Temperature and Humidity are variables easy to understand and correlate, but as there was litle information about the Soil Moisture sensor itself, I measured both with the sensor in the free air and submerged into a glass of water, I found out the range was between 0-700 units. The next step was to water the pepper pot and see the Soil Moisture value when the plant if fully watered, then see the chart going down until the next watering session (when the leaves are "sad" as my wife says), so we can see at which values do we have to trigger an alert.

 The actual code was mostly taken from Ubidots examples, as the sensors at this present stage are mostlly analogue, it was only required to use the analogRead() call from the Arduino API. The sensors are from Grove: the temperature and humidity sensor is I2C-based, the soil moisture and light sensor are analogue.
With the sensors and the Ubidots platform figured out, the next step was to make the whole thing to run on battery as a stand-alone device. For this I used the Spark Core I won at IoTogether Hackaton along with a battery charger board Isteal borrowed from work, and a 3.7V 800mAh Li-ion battery connected to a battery charging circuit.
To avoid having to solder a wire to the USB 5VDC pin I added a scrambled jumper logic to enable charging the battery when connected to the micro-USB, else the Spark Core will be powered by the battery only. I have also one power input to throw in a solar panel and charge the battery in the day and discharge over the night, but I still have to figure out how to adapt it to the enclosure.

I added 2 Phidget-like connector to be able to connect Phidget sensors or analog ones following the same pin-out (VDC/GND/Signal), and one Ziglet-like connector to connect any I2C-based sensor, as at the end I want to use digital sensors to keep the power consumption as low as possible, having wired a GPIO pin also to the connector to use interrupts from the sensors as well.
The male pin-header exposes unused GPIOs to be used later, for example one wandering idea is to add an MP3 board with an amplifier and a small speaker, as allegedly this helps plants grow, or maybe do a playback of my wife talking to the plants, which one was it? nevertheless it would also be kinda cool to play nature music when presence is detected... this will be likely an improvement to make if the power consumption can be kept low.
One caveat: I was one of the unlucky Spark owners who had a board with faulty DNS resolve, so I had to include an external DNS client to resolve Ubidots IP address, and then add the host property to my header and initiliaze the Server IP address as shown below:
The AWAKE_BEFORE_SLEEP delay makes sure the Spark Core stays awake for 20 seconds, which gives me enough time to reprogram the Spark over the Web IDE from my PC without having to connect the Spark to the host over USB. One of the things on my to-do list is to measure the current consumption of the device.
The whole thing fits into a standard enclosure, one of the things I have still pending to do is to adapt the sensors to the enclosure, make a small window to be able to visualize the LED, and also fix the solar panel. I have convinced my daughters to paint the enclosure with a festive theme, so surely I will post this anytime soon.

So that's it, I'm hoping in the holidays to have time to improve the Prototype B, make some measurements and work on the solar panel. One of the things I will surely test is the ESP8266 cheap WiFI board, but with my Photon already ordered in pre-sale for next year, I think it will make worth the wait, in time for the Prototype C, maybe even a release.
Prototype A: Intel Galileo on board
For the first prototype I used the Intel Galileo Board I won at Senzations, the objective was to test the sensors, familiarize with the obtained values, and test publishing to Ubidots. For the test I used my wife's pepper plant.
Light, Temperature and Humidity are variables easy to understand and correlate, but as there was litle information about the Soil Moisture sensor itself, I measured both with the sensor in the free air and submerged into a glass of water, I found out the range was between 0-700 units. The next step was to water the pepper pot and see the Soil Moisture value when the plant if fully watered, then see the chart going down until the next watering session (when the leaves are "sad" as my wife says), so we can see at which values do we have to trigger an alert.

Prototype B: Spark Core
With the sensors and the Ubidots platform figured out, the next step was to make the whole thing to run on battery as a stand-alone device. For this I used the Spark Core I won at IoTogether Hackaton along with a battery charger board I
To avoid having to solder a wire to the USB 5VDC pin I added a scrambled jumper logic to enable charging the battery when connected to the micro-USB, else the Spark Core will be powered by the battery only. I have also one power input to throw in a solar panel and charge the battery in the day and discharge over the night, but I still have to figure out how to adapt it to the enclosure.
I added 2 Phidget-like connector to be able to connect Phidget sensors or analog ones following the same pin-out (VDC/GND/Signal), and one Ziglet-like connector to connect any I2C-based sensor, as at the end I want to use digital sensors to keep the power consumption as low as possible, having wired a GPIO pin also to the connector to use interrupts from the sensors as well.
The male pin-header exposes unused GPIOs to be used later, for example one wandering idea is to add an MP3 board with an amplifier and a small speaker, as allegedly this helps plants grow, or maybe do a playback of my wife talking to the plants, which one was it? nevertheless it would also be kinda cool to play nature music when presence is detected... this will be likely an improvement to make if the power consumption can be kept low.
One caveat: I was one of the unlucky Spark owners who had a board with faulty DNS resolve, so I had to include an external DNS client to resolve Ubidots IP address, and then add the host property to my header and initiliaze the Server IP address as shown below:
http_header_t headers[] = {
     { "Content-Type", "application/json" },
     { "X-Auth-Token" , TOKEN },
     { "host", "things.ubidots.com" },
     { NULL, NULL }
};

IPAddress dnsServerIP(8,8,8,8);
IPAddress remote_addr;
DNSClient dns;

char serverName[] = "things.ubidots.com";

void setup() {
    request.port = 80;
    dns.begin(dnsServerIP);
    dns.getHostByName(serverName, remote_addr);
    request.ip = remote_addr;
}
Then to take advantage of the Spark low power mode and try to save battery as most as possible, I use the SLEEP_DEEP_MODE to put the Spark to sleep and awake after 5 minutes, rebooting the code with no memory retention, which is fine in my case as I only want to take single readings and upstream these. The code runs as follows:void loop() {
// Read data from the sensors
getData();
// Send data to Ubidots
postData();
// Short blink to indicate we have finished posted
blink_led(500);
// Stay awake enough time to allow being reprogramed
delay(AWAKE_BEFORE_SLEEP);
// Put the core back to sleep
Spark.sleep(SLEEP_MODE_DEEP, SLEEP_SECONDS);
}
The AWAKE_BEFORE_SLEEP delay makes sure the Spark Core stays awake for 20 seconds, which gives me enough time to reprogram the Spark over the Web IDE from my PC without having to connect the Spark to the host over USB. One of the things on my to-do list is to measure the current consumption of the device.
The whole thing fits into a standard enclosure, one of the things I have still pending to do is to adapt the sensors to the enclosure, make a small window to be able to visualize the LED, and also fix the solar panel. I have convinced my daughters to paint the enclosure with a festive theme, so surely I will post this anytime soon.
So that's it, I'm hoping in the holidays to have time to improve the Prototype B, make some measurements and work on the solar panel. One of the things I will surely test is the ESP8266 cheap WiFI board, but with my Photon already ordered in pre-sale for next year, I think it will make worth the wait, in time for the Prototype C, maybe even a release.
Bring Oneiric-based distros back to live in Linaro and IGEP board
Following the end-of-year tradition of updating production boards, I found an ISEE IGEP v2 board running Linaro distribution on an Oneiric-based release, which reached end of life on May 2013. One option would be upgrading to a new LTS distro, but as time was limited and the current owner has a if-works-don't-touch strict policy, I choosed instead to update at least its sources:
Just edit the /etc/apt/sources.list file and replace with the following:
Then run:
Don't forget to also test for ShellShock vulnerability.
W: Failed to fetch http://security.ubuntu.com/ubuntu/dists/oneiric-security/main/source/Sources 404 Not Found
Just edit the /etc/apt/sources.list file and replace with the following:
deb http://old-releases.ubuntu.com/ubuntu/ oneiric main
deb-src http://old-releases.ubuntu.com/ubuntu/ oneiric main
deb http://old-releases.ubuntu.com/ubuntu/ oneiric-updates main
deb-src http://old-releases.ubuntu.com/ubuntu/ oneiric-updates main
deb http://old-releases.ubuntu.com/ubuntu/ oneiric universe
deb-src http://old-releases.ubuntu.com/ubuntu/ oneiric universe
deb http://old-releases.ubuntu.com/ubuntu/ oneiric-updates universe
deb-src http://old-releases.ubuntu.com/ubuntu/ oneiric-updates universe
deb http://old-releases.ubuntu.com/ubuntu oneiric-security main
deb-src http://old-releases.ubuntu.com/ubuntu oneiric-security main
deb http://old-releases.ubuntu.com/ubuntu oneiric-security universe
deb-src http://old-releases.ubuntu.com/ubuntu oneiric-security universe
Then run:
sudo apt-get update
Don't forget to also test for ShellShock vulnerability.
Wednesday, 3 December 2014
Fix Shellshock on non LTS/deprecated Unix distros
Plenty of things have been said about Shellshock vulnerability and solutions, most of them consisting of upgrading the bash module for LTS distros, but lately as I have dusted my ALIX board based on Voyage 0.9.0 distribution, I found this was not an option: even after upgrading and downloading the bash packet from the dist pool, there were requirements missing to upgrade/install bash from the packet manager. This was my current bash version:
The bash version did not matched the fixed ones, anyways to test if you are affected you can run on a terminal the code below, if both lines are showed, then it is affected.
After running the script the bash has been patched and the shellshock test now ommits the "busted" line.
Sources:
# bash --version
GNU bash, version 4.1.5(1)-release (i486-pc-linux-gnu)
Copyright (C) 2009 Free Software Foundation, Inc.
License GPLv3+: GNU GPL version 3 or later <http://gnu.org/licenses/gpl.html>
The bash version did not matched the fixed ones, anyways to test if you are affected you can run on a terminal the code below, if both lines are showed, then it is affected.
# env X="() { :;} ; echo busted" `which bash` -c "echo completed"
busted
completed
I found a fix at ShellShocker and it was as easy as running the snippet below (although I would not recommend executing remote scripts, it is not a good practice), but if you are curious about what it does, or you want to run this yourself, the sources are also listed below.curl https://shellshocker.net/fixbash | sh
After running the script the bash has been patched and the shellshock test now ommits the "busted" line.
# bash --version
GNU bash, version 4.3.30(1)-release (i586-pc-linux-gnu)
Copyright (C) 2013 Free Software Foundation, Inc.
License GPLv3+: GNU GPL version 3 or later <http://gnu.org/licenses/gpl.html>
Sources:
Fix EXT2 ext2_lookup deleted inode referenced
Deleted inodes are a common problem when working with SD cards, specially noticeable in ALIX-bsaed boards running Voyage or alike. Remove the SD, connect as an external drive to your host (I'm connecting to an Ubuntu-based VM) and do the following:
Identify your disk using the information above, then check and repair the file system using e2fsck, when prompted you can comply with the suggested fix by pressing "y". This should be the output if no errors are found.
$ sudo fdisk -l

Disk /dev/sda: 16.1 GB, 16106127360 bytes
255 heads, 63 sectors/track, 1958 cylinders, total 31457280 sectors
Units = sectors of 1 * 512 = 512 bytes
Sector size (logical/physical): 512 bytes / 512 bytes
I/O size (minimum/optimal): 512 bytes / 512 bytes
Disk identifier: 0x000cb32b

   Device Boot      Start         End      Blocks   Id  System
/dev/sda1   *        2048    28350463    14174208   83  Linux
/dev/sda3        28352512    31457279     1552384   82  Linux swap / Solaris

Disk /dev/sdb: 3997 MB, 3997163520 bytes
128 heads, 63 sectors/track, 968 cylinders, total 7806960 sectors
Units = sectors of 1 * 512 = 512 bytes
Sector size (logical/physical): 512 bytes / 512 bytes
I/O size (minimum/optimal): 512 bytes / 512 bytes
Disk identifier: 0xfc8a205c

   Device Boot      Start         End      Blocks   Id  System
/dev/sdb1   *           1     7370495     3685247+  83  Linux
Identify your disk using the information above, then check and repair the file system using e2fsck, when prompted you can comply with the suggested fix by pressing "y". This should be the output if no errors are found.
$ sudo e2fsck -f /dev/sdb1
e2fsck 1.42 (29-Nov-2011)
Pass 1: Checking inodes, blocks, and sizes
Pass 2: Checking directory structure
Pass 3: Checking directory connectivity
Pass 4: Checking reference counts
Pass 5: Checking group summary information
ROOT_FS: 121871/230608 files (2.0% non-contiguous), 807088/921311 blocks
Tuesday, 2 December 2014
Disable 6lbr to be launched at boot
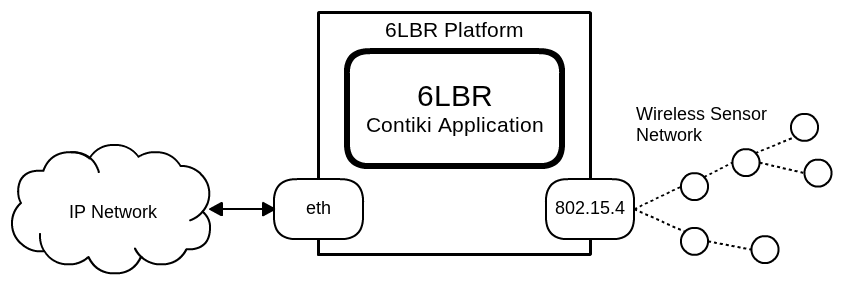
I luckily found out 6lbr some months ago (I have an unfinished post about it yet to finish, loving foren6 also), but I needed to stop the service to be launched from boot while I did some testing. As I didn't found any configuration tweak to do so, I disabled the service at all /etc/rcX.d run levels using the well known update-rc.d script.
update-rc.d -f 6lbr remove
To enable back:
update-rc.d 6lbr defaults
And business as usual.
Monday, 1 December 2014
Stop the LG SmartShare service to be launched at boot (Windows 7)
Short story: LG SmartShare DLNA media sharing service was slowing down Windows boot abnormally, and the built-in settings do not provide the polite option to disable launching the application at boot. After checking the usual suspects (msconfig and Startup folder), I found where the SmartShare task was being scheduled.

Just go to the Administrative Tools menu and open the Task Scheduler.
Just go to the Administrative Tools menu and open the Task Scheduler.
Sunday, 30 November 2014
IoTogether Hackaton 2014: IoT loving with the LoveTotem

IoTogether was a competition event for 7-8 co-located teams in Trento and Barcelona. Remote teams will be composed by participants from both sides who will be asked to interact via Future Internet videoconferencing tool provided by the SPECIFI project.***
Sponsors: SPECIFI, COMPOSE and VISIONAIR.
Partnership: CREATE-NET, MuSe, BCNLab, I2CAT and the City of Barcelona.
The idea was as freaky as it could get, is a lot funnier to start explaining our team concept from the prototyping stage up to the final application...
At the Barcelona location we implemented a force sensor with a 3-axis accelerometer integrated to a wool glove, to measure both force of impact, movement and acceleration, displayer over a LED bar for our viewing pleasure, hooked up with a GSR (Galvanic Skin Response) sensor to measure the "arousal" level of its wearer. To interface the sensors we used an Arduino bundled with a WiFI module, to send the sensed data over Glue.Things to the Trento location.
We did also manage to send data to Ubidots and The Things.IO.

At Trento side there was a dildo-shaped lamp (yes, a dildo), changing colors according to the data received from the glove by selectively turning RGB LEDs, using force, acceleration, arousal and muscular response data... well, you know, leave it to the Italians to sex-it up a Hackaton :)
One of the main challenge of the event was actually to set up everything from each side while talking to each group, unfortunately the co-location resources went bad and we ended up talking over Skype, and emulating both input and outputs isolated, but at the end we were glad it worked out.

The official name of the project was "The LoveTotem", to be honest the horny lamp would be a better name, but regardeless the name of the actual use case, what was interesting about the project, and the event, was to put a bunch of people together, with the right tools and attitude, and create something, whatever, as long as it works, you cannot save the world with a killer app in 4 hours, but building "anything" is the first step to get more stuff rolling... who knows? everything can be reused and interpreted in many different ways, with a different angle this would also make a good physical rehabilitation tool, a social game to take introverts into social engaging with physycal interaction with others, nnevertheless, I loved the lamp challenge... it was so out of my field that it was cool to try to design a matching application to feed love to the Totem.
This was the official description of the project:
"LoveTotem": Suppose you are too far from your sweetheart and you want to know how really he/she feels, or share emotions without talk! Your partner can wear the LoveSensors: when you'll turn on your LoveTotem, you'll see it take strong/hot color if your partner is excited, or soft blue light if is relaxed. Love Totem uses an open hardware platform (Arduno Yun) and human sensors like (Muscle sensor,Temperature/Humidity, GSR) in order to track the state of a person and transmits these data through dedicated API to a cloud platform (GlueThings). On the other side, another Love Totem will retrieve these data, representing them with a mix of some colored leds. Leds are placed in a lamp, which we have designed and made using a laser cutter and a 3d printer.At the end our team was one of the two winning teams of the event, with a caveat: the team members posted at SPECIFI site is wrong, Barcelona's team members are swapped with other team (Aitor is actually a colleague of work, but at a different group), the correct line-up is the following: Andrés Hernández Casaus, Hector Esteller, Pablo Carbajal and yours truly.
We got plenty of goodies, including Spark Cores for each of the members, sensors (I got a soil moisture sensor, the GSR and a couple of buzzers), along with a Shield-Shield.
Here is the full list of the developed projects:
- "SeeTy": a urban garden community that merges gardens around the world.
- "LoveTotem": a lamp to express remote feelings for lovers.
- "WineCheck": check wine bottles temperatures on your smartphone.
- "Remote Interactive House Control": remote management of houses temperature & humidity.
- "EmotionalBag": a bag monitoring and displaying its user's emotional status.
- "SmartGlove": a glove that senses the heart beat and the level of stress.
- "BluePresence": a smartwatch managing smartlights with power consumption profiling.
- "CarFinder": cars tracking on the web with GPS sensor.
Saturday, 29 November 2014
Clean-up unused Linux Kernels in Ubuntu
Original article by Mark McBride
At development I tend to keep more than one Virtual Machine sandboxes, normally Unix-based running on a Windows host (because of reasons), so from time to time I have to clean-up the garbage and maintain the user-disk cuota as low as possible to avoid eating up the VM drive.
The original author makes a pretty good explaination on the command sintaxis (basically list the kernels and strip-down recursively to usable name strings to uninstall them), so I'm just going to copy here the actual command:
Only one caveat: I removed the -y argument from the apt-get purge command to avoid eliminating automatically, instead you will get prompted to purge the listed kernels. To check the used disk space:
At development I tend to keep more than one Virtual Machine sandboxes, normally Unix-based running on a Windows host (because of reasons), so from time to time I have to clean-up the garbage and maintain the user-disk cuota as low as possible to avoid eating up the VM drive.
The original author makes a pretty good explaination on the command sintaxis (basically list the kernels and strip-down recursively to usable name strings to uninstall them), so I'm just going to copy here the actual command:
dpkg -l 'linux-*' | sed '/^ii/!d;/'"$(uname -r | sed "s/\(.*\)-\([^0-9]\+\)/\1/")"'/d;s/^[^ ]* [^ ]* \([^ ]*\).*/\1/;/[0-9]/!d' | xargs sudo apt-get purge
Only one caveat: I removed the -y argument from the apt-get purge command to avoid eliminating automatically, instead you will get prompted to purge the listed kernels. To check the used disk space:
$ du -h /boot --max-depth=0
Network Printer with CUPS in a Raspberry Pi
Short story: I was tired of having to skpe or mail files to the secretary for her to print it in my behalf, and working in a highly tech-oriented company, it was embarrasing, so the Raspberry Pi came to the rescue once again...
Sources:
Bartbania
Libre Geek
Install CUPS:
Install Samba and dependencies to make the Printer accessible over the network:
Then edit the configuration file to enable network printing and sharing the printer, below are the most interesting lines in my configuration file:
Then either reboot the Raspberry Pi or restart CUPS:
And that should be all, next we need to add the printer connected to the Raspberry Pi over the USB port, the process should be straight-forward. The CUPS driver provides a webserver accessible over the socket specified by the RPi's IP and Port assigned in the cupsd.conf file.

Sources:
Bartbania
Libre Geek
Install CUPS:
sudo apt-get install avahi-daemon cups cups-pdf python-cupsOnce installed (it will take a while) add our user to the lpadmin group, in this case I'm assuming the default user "pi".
sudo usermod -a -G lpadmin pi
Install Samba and dependencies to make the Printer accessible over the network:
sudo apt-get install samba libncurses5-dev bridge-utils
Then edit the configuration file to enable network printing and sharing the printer, below are the most interesting lines in my configuration file:
pi@raspberrypi ~ $ sudo cat /etc/cups/cupsd.conf

# Allow remote access
Port 631

# Enable printer sharing and shared printers.
Browsing On
BrowseOrder allow,deny
BrowseAllow all
BrowseRemoteProtocols CUPS dnssd
BrowseAddress 192.168.1.255
BrowseLocalProtocols CUPS dnssd
DefaultAuthType Basic
WebInterface Yes
ServerName 192.168.1.28

<Location />
 Order Deny,Allow
 Deny From All
 Allow From 127.0.0.1
 Allow From 192.168.1.*
</Location>

<Location /admin>
  Order allow,deny
  Allow @Local
</Location>

<Location /admin/conf>
  AuthType Default
  Require user @SYSTEM
  Order allow,deny
  Allow @Local
</Location>
Then either reboot the Raspberry Pi or restart CUPS:
sudo service cups restart
And that should be all, next we need to add the printer connected to the Raspberry Pi over the USB port, the process should be straight-forward. The CUPS driver provides a webserver accessible over the socket specified by the RPi's IP and Port assigned in the cupsd.conf file.
Subscribe to:
Posts (Atom)